On a part that is going to be painted, some areas have to come out without paint: the thread where a screw goes in, the housing of a bearing with its tolerance, the point where the ground connection is attached. Masking means covering them before painting and uncovering them afterwards. It sounds simple, but how it is done determines the paint edge, the adhesive residue and the rework at the end of the line.
Which areas are masked, and why
A powder coat is of the order of 60 to 120 µm thick. On a smooth surface you do not notice it; on a part with fits, you do. These are the areas most often covered:
- Threads. The paint fills the thread: the screw will not go in, or goes in under force and tears off the paint around it.
- Holes and housings with tolerances. Bearing seats, bushings and pins: 0.1 mm of paint is enough to change the fit.
- Grounding points and electrical contacts. Powder coating is an insulator. Where a ground terminal or a contact goes, the metal has to stay bare.
- Bearing and joining faces. Surfaces that are bolted against another part, and areas that are later welded or bonded.
Masking too much also costs: every covered area means time spent applying the tape and removing it. The practical approach is for the part drawing to state which areas go unpainted, rather than deciding it on the line.
Tape, discs or plugs: which method for each area
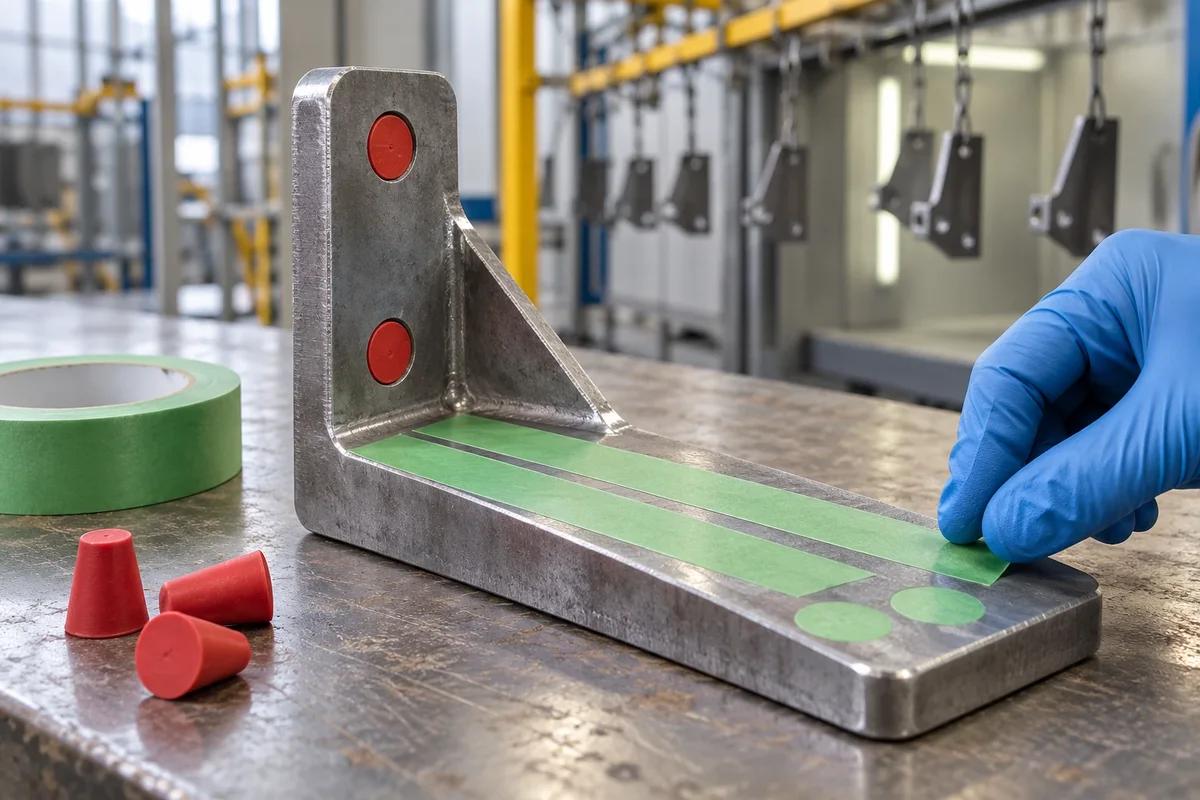
There are three usual ways to cover an area, and on a single part they are often combined.
| Method | Which areas | Points to consider |
|---|---|---|
| Tape on a roll | Flat faces, strips, edges and straight contours | Cut to size on the line; on tight curves it is applied in sections |
| Die-cut discs and shapes | Small blind holes without thread, bearing faces and areas that repeat on every part | Cut from the same tape: always identical and quicker to apply than hand-cut tape |
| Silicone plugs and caps | Through holes, internal threads and studs | Reusable several times; each size needs its own plug |
A typical part combines all three: discs on the bearing faces, plugs in the threads and tape on the edges. If an area repeats on all your parts, tell us and we will look into supplying the tape die-cut.
How to choose the tape
A paper masking tape with rubber adhesive is intended for lower-temperature drying; even high-temperature paper tapes fall short of the 170 to 200 °C of a powder cure. In the oven, the adhesive degrades and leaves residue, or the paper becomes brittle and tears when removed. For powder coating and cataphoresis, film tapes with silicone adhesive are used. Four factors decide which one:
- Oven temperature and time. In powder coating, cures usually run from 170 to 200 °C, normally for 10 to 20 minutes with the part at that temperature; on heavy parts the total time in the oven is longer, because they take longer to heat up. The tape has to withstand the maximum temperature with a margin and throughout the whole cycle.
- The film. Polyester for most cures; polyimide when the temperature goes above what polyester can withstand.
- The adhesive. Silicone withstands the oven temperature and is designed to be removed without leaving adhesive residue on the part.
- Thickness and adhesion. A thinner tape conforms better to radii and edges; a thicker one with more adhesion withstands handling and the baths better.
| Tape | Film | Total thickness | Adhesion to steel | Temperature |
|---|---|---|---|---|
| Ref. 2560 | Green polyester | 0.060 mm | ≥ 520 g/25 mm | Up to 200 °C |
| Ref. 3565 | Green polyester, thicker | 0.065 mm | ≥ 600 g/25 mm | Up to 210 °C |
| Ref. 4201 | Amber polyimide | 0.065 mm | 5–6 N/25 mm | 180 °C continuous; up to 280 °C without residue |
Data from the technical data sheets. The data sheets give the maximum temperature, not the exposure time. Ref. 4201 is listed for electronics and electrical insulation: for painting, it is validated first with a sample.
The green film of the polyester tapes has a practical purpose: before the part enters the booth you can see at a glance whether any area is still to be covered, and on exit, whether any tape is left to be removed.
Step by step: from the unpainted part to the finished part
- Mask at the right point on the line. In powder coating, after pre-treatment and drying, just before the booth: the tape goes on clean, dry metal. In cataphoresis, pre-treatment and the bath usually follow one another, so the tape is applied before the part enters the line and also goes through the baths.
- Clean, dry surface. Oil, water or dust under the tape stop the edge from adhering and let paint get underneath. Parts are handled with gloves.
- Apply without stretching. A tape stretched as it is laid tends to shrink back with heat and lifts the edge. Lay it on without tension and press it down afterwards.
- Press the edges down well. The edge of the tape is the edge of the paint. Go over it with a fingernail or a plastic spatula, leaving no bubbles or wrinkles.
- Cut flush. On contours, the tape is cut with a utility knife along the edge of the part. A piece that sticks out is painted on both sides and tears when removed.
- Paint and cure. The tape goes through the booth and the oven with the part.
- Remove the tape. Pull it back on itself at a steady pace. Many lines remove it while the part is still warm and others when cold: test on your line which moment gives the cleanest edge. If the paint forms a continuous film over the edge of the tape, scoring that edge with a blade before pulling prevents the paint from chipping off in flakes; take care not to scratch the paint or the machined area, and test it first on a part.
Common problems and their cause
| What you see | Probable cause | What to do |
|---|---|---|
| Adhesive residue on the part | Oven above what the tape withstands, in temperature or in time, or an adhesive that is not meant for ovens | Tape with silicone adhesive and a maximum temperature above the oven's; validate the time |
| Paint under the edge | Dirty or wet surface, edge not pressed down, or tape stretched when applied | Clean and dry, apply without tension and go over the edge |
| Paint chips off when the tape is removed | Continuous paint film over the edge of the tape | Score the edge with a blade before pulling, without scratching the part, and try removing the tape while the part is warm |
| The tape tears when removed | Film degraded by excess temperature, or pieces that stick out and are painted on both sides | Higher-temperature tape, and cut flush with the edge of the part |
| Uneven paint edge | Tape cut by hand or applied with wrinkles | Die-cut discs or shapes for the areas that repeat |
How to validate the tape before production
Because the data sheets give the maximum temperature and not the time, the test is done with your actual cycle. A few parts are masked in the real areas, go through pre-treatment, painting and the oven, and when the tape is removed four things are checked:
- that no adhesive residue is left;
- that the paint edge comes out clean;
- that no paint has got underneath;
- that the tape comes off whole, without tearing.
We will send you a sample of the tape in the width you need. If the part also carries an identification label that goes through the paint, the guide to labels for powder coating, cataphoresis and shot blasting explains which material withstands each stage.
Which areas do you need to mask? Tell us the part, the width you need and the oven temperature and time.
Ask with no obligationSummary
The areas that get masked are those where paint is a problem: threads, fits with tolerances, grounding points and joining faces. Tape covers faces and edges, die-cut discs deal with the areas that repeat, and silicone plugs deal with holes and threads.
For the oven, a film tape with silicone adhesive is used: polyester up to 200-210 °C, like Ref. 2560 and 3565, and polyimide above that. The tape goes on clean, dry metal, without stretching and with the edge pressed down well, and is removed by pulling it back on itself.
The test that counts is a run of parts through your real line, with its curing temperature and time.
Frequently asked questions
Is masking done before or after pre-treatment?
It depends on the line. In powder coating, after: the tape is applied to the part once it has been pre-treated, clean and dry, just before the booth. In cataphoresis, pre-treatment and the paint bath usually follow one another with no intermediate drying, so the tape is applied before the part enters the line and also has to withstand the baths.
Is paper masking tape suitable?
Not for a powder curing oven. Paper tapes with rubber adhesive are intended for lower-temperature drying; even high-temperature paper tapes fall short of the 170 to 200 °C of a cure. The adhesive degrades and leaves residue on the part, or the paper becomes brittle and tears when removed.
When is the masking tape removed?
After curing. Many lines remove it while the part is still warm and others when cold: it is worth testing both. The tape is pulled back on itself at a steady pace. If the paint forms a continuous film over the edge, the edge can be scored first with a blade so that the paint does not chip, taking care not to scratch the paint or the machined area and testing it first on a part.
How are threads and holes masked?
Through holes and internal threads are normally closed with silicone plugs; studs and external threads, with caps or by wrapping them with tape. Small blind holes without thread and bearing faces are covered with tape discs.
What temperature does the tape have to withstand?
It has to exceed the oven's maximum temperature, and hold up for the whole curing time. In powder coating, cures usually run from 170 to 200 °C. Above the 200-210 °C of the polyester tapes, the option is the polyimide tape Ref. 4201: its data sheet gives 180 °C for continuous exposure and 280 °C maximum without residue, with no exposure time, and lists it for electronics and insulation, so for painting it is validated first with a sample in the actual cycle.
Can the same tape be used in cataphoresis?
Yes: the data sheets for Ref. 2560 and 3565 list them for powder coating, cataphoresis and anodizing. In cataphoresis the tape also goes through the pre-treatment baths and the paint bath, so the test has to cover the whole line, not just the oven.